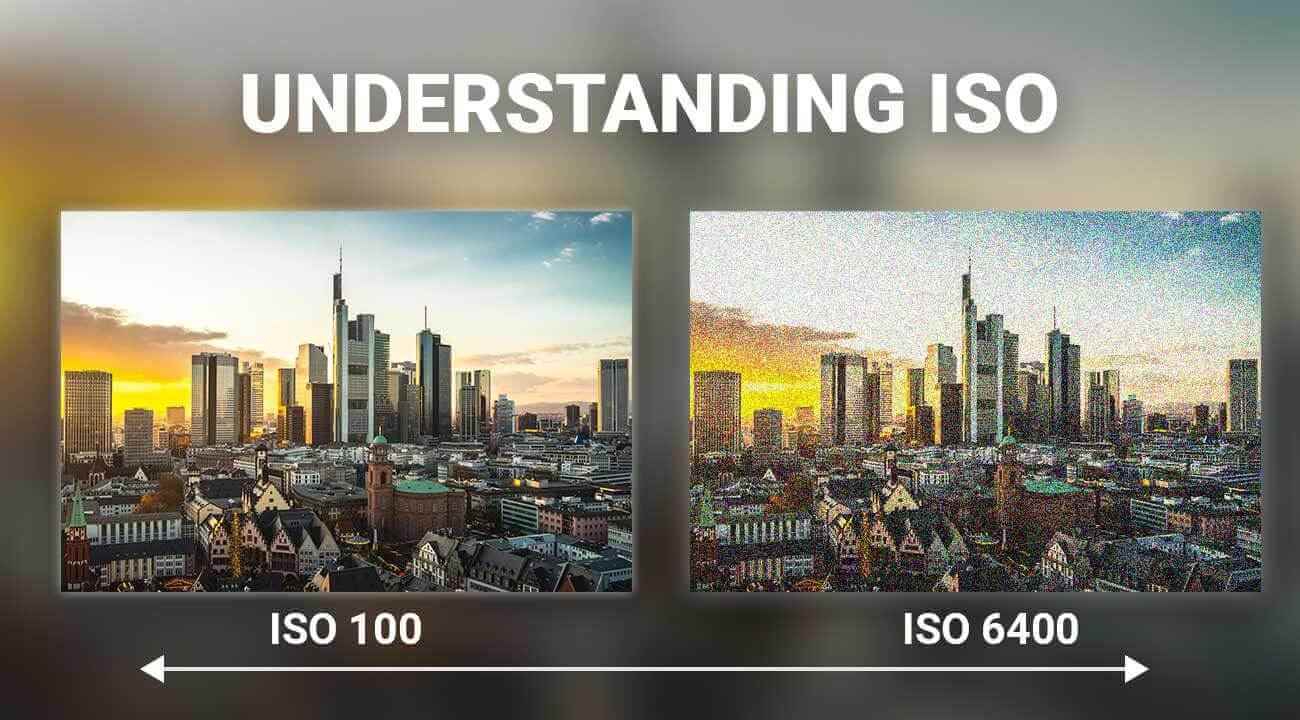
Whether you are a professional photographer or a novice, you must have heard of the term ISO. A good understanding of ISO is vital for capturing high-quality images. There are situations when you might want to raise your ISO, while in other circumstances, you might want to lower it.
Thinking about how to use ISO effectively? Then you are on the right site because we have put forth all the basics of ISO and how you can use it to enhance your capability of creative shooting.
What is ISO?
There are pillars of photography that help you get the correct exposure, the Shutter speed, the aperture, and the ISO. Among the three factors, ISO plays a major role for setting the proper exposure. Besides, it is also the most clear-cut topic to understand and use in your photography.
Simply put, ISO is a feature that lets you either brighten or darken an image. In a darker environment, you might want to increase the exposure of your image. You can do it in many ways using shutter speed and aperture, but ISO can be more helpful instead of going for the complex process.
However, increasing the ISO may result in noise which might lower the quality of your images. Then again, images also look sloppy if you shot in low light situations without raising ISO. so the bottom line is- you have to come to a zone of fit where you increase the ISO to an amount that doesn’t visibly hamper the image quality.
As for me, I’m more into product photography. Often I do not find enough light as I mostly shoot indoors. And, this is when the ISO matters. I have to use an artificial lighting setup in my studio to keep the ISO to a lower number. So if you are also shooting in low light situations like me, you can get some affordable lights to maintain the base ISO.
- Now, what is base ISO?
It is the lowest value of the native ISO of your camera. Most of the DSLRs and Mirrorless cameras nowadays feature a Base ISO of 100. If you are thinking of how and why base ISO is important for your photography, well, it lets you click the highest quality images that your camera is capable of capturing. So the rule of thumb is- you should choose the base ISO whenever you get a chance. However, it is not always possible in low-light environments.

When to Use Low ISO?
Theoretically, ISO helps to brighten the image. So if the environment is well lit, you can choose an ISO number as low as 100 or 200. Even in a poorly lit environment, you can still keep the ISO to a lower number if the subject you are going to shoot is not moving.
For example, in some of my commercial product photography where I can’t use artificial lighting for some reason, I usually have my camera mounted on a tripod and set a long shutter speed so that enough light can enter the camera sensor. And this is how I achieve crisp and sharp images while maintaining lower ISO even in low light situations. But keep in mind that, if you set a longer shutter speed, anything that is moving in the frame will be shown as a blurred object in the final image.
When to Use Higher ISO?
Though higher ISO usually introduces grain in your image, there are certain situations when you need to use the higher ISO.
For example, when you are shooting a very fast-paced scenario like in sports or a flying bird, you need a very fast shutter speed, meaning you are letting a trivial amount of light enter into the sensor. In these situations, a higher ISO is usually preferred to get the right amount of exposure.
Final Verdict
So that was all about ISO. I hope you now have a better understanding of ISO and a clear concept of using it effectively. If you think you know another useful tip about ISO, let us know in the comment section.


